solar system info:
If you omit minute or second, they're taken as zero. The entry in the example box above represents 22:00 (10 P.M.) Universal Time on September 17th, 1993, the date of the second approach of the "triple conjunction" between Uranus and Neptune in that year. Check the UTC box and press "Update" and observe how Earth, Uranus, and Neptune lined up at that moment. Hold a ruler to your monitor and note how precise the alignment was.
If you're entering dates before 1 A.D., note that Solar System Live follows the astronomical convention where the year historians call 1 B.C. is denoted "year 0", 2 B.C. "year -1", and so on. Thus, to specify the year "413 B.C." you would use "-412" in the Universal Time box. See the discussion below for more details, including the change-over from the Julian to the Gregorian calendar in 1582.
By starting so far in the past, all historical observations can be expressed by positive Julian Day numbers. Time is expressed by a decimal fraction of days. The Julian Day in the box above, 1719286.5, corresponds to midnight, Universal Time, February 25, -5. Notice how the Earth, Mars, Jupiter, and Saturn are close to being along a straight line. Indeed, at this moment, seen from Earth, a rare (not to repeat for 800 years) conjunction among Jupiter (traditional king of the gods), Saturn (ruling planet of Judah), and Mars, shown like a beacon in the Western sky, in the constellation of Pisces the Fish (the House of the Hebrews) where the equinox had just entered, crossing the border from Aries where it had been since the Greeks. Some people believe this was the Star of Bethlehem. You'll recall that the early Christians recognised one another with the sign of a fish.
You can enter any Julian date between 0.5 (January 1, -4712) and 4346655.5 (December 31, 8000). For Julian dates for years before 1 A.D., note that astronomers and historians use different conventions for those years. In history books, the year that preceded 1 A.D. is called 1 B.C.; zero not having come into use in European culture at the time. Astronomers consider the year before 1 A.D. as "year 0". Thus when an astronomer talks about an eclipse having occurred in the year -412, that's the year historians refer to as "413 B.C.". In converting Julian days to historical dates, Solar System Live assumes the canonical date for the adoption of the Gregorian calendar, Friday, October 15th, 1582. Many countries shifted to the Gregorian calendar much later; in Great Britain, not until 1752. When investigating events in history, make sure you express all dates after October 15th, 1582 in the Gregorian calendar.
This box controls the size of the orrery image generated by Solar System Live. Image size in pixels is automatically limited to values between 100 and 1024 (512 if generating a stereo pair). Smaller images smash everything together to such an extent they're useless, and larger images require too much computer time to generate and consume network bandwith out of proportion to the added comprehensibility.
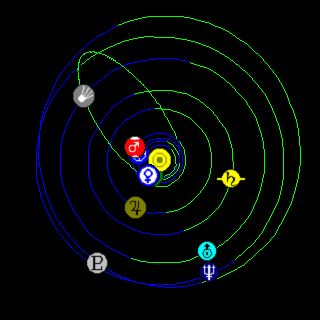
"Equal" chooses a presentation you may recall from your elementary school Science Is Good textbook (assuming you're young enough to remember elementary school yet old enough to remember when Science was Good)--all the orbits are shown equally spaced from one another (with a tip of the hat to the eccentricity of the orbits of Mercury, Mars, and Pluto). The Equal view isn't included entirely for nostalgia; it's very useful for viewing the solar system as a whole when, for example, you're interested in events such as conjunctions (appulses) between Venus and Jupiter.
In order to calculate the positions of the planets in the sky as seen from your location for the ephemeris, Solar System Live needs to know your latitude and longitude. You can enter degrees, minutes, and seconds as either 6°57'11" or 6d57m11s. You can also enter latitude and longitude as degrees and a decimal fraction: 19.5° and 19°30' are equivalent specifications. Be sure to check the boxes for North and South latitude and East and West longitude as appropriate. The example above is set to the latitude and longitude of Melbourne Australia.If you use Solar System Live on a regular basis, you'll probably want to make a custom request so you don't have to enter your latitude and longitude every time
The heliocentric longitude rotates the solar system with respect to your viewpoint--you can, for example, put the Earth in the front of an oblique display to see which planets are in conjunction and opposition more easily.
For example, here's a view of the solar system with Halley's comet plotted by specifying its orbital elements.
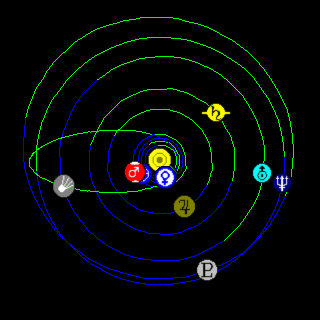
The viewpoint is the default:
As described in the help for Orbit Plotting, Halley's Comet's appearing on the green portion of its orbit indicates the comet is below the plane of the ecliptic (the plane defined by the orbit of the Earth). Pluto, on the other hand, is on the blue portion of its orbit, indicating that planet is above the plane of the ecliptic.
Using the Heliocentric latitude and longitude controls, we can change the viewpoint to make this more evident. First, let's set the longitude to "turn" the solar system so the orbit of Halley's comet points to the left. Setting the longitude to 305° does the trick:
This also brings Pluto to a convenient position at the front. Now, to show the inclination clearly let's rotate the solar system so the ecliptic is edge-on. To do this, change the heliocentric latitude from 90° (above the north pole of the Sun) to 0° (in the plane of the ecliptic, looking at the Sun's equator).
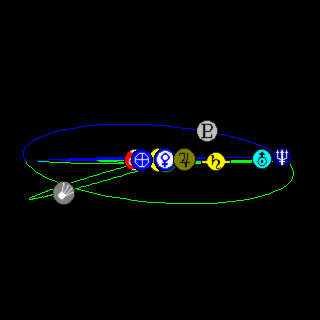
This viewpoint clearly shows the positions, above and below the ecliptic, respectively, of Pluto and Halley's Comet. It's also evident from this viewpoint that the other planets orbit very close to the plane of the ecliptic.
Choice of a suitable heliocentric viewpoint, especially in conjunction with stereoscopic viewing, makes it much easier to visualise the path through the Solar System of comets with highly eccentric and/or inclined orbits.
Accurately representing the orbits of all the planets in a single image is very difficult. There are really two solar systems: the inner system (Mercury through Mars), and the outer system (Jupiter through Pluto). If you draw the outer system to scale, the inner system is reduced to a bunch of tiny, almost overlapping ellipses crowded near the Sun. (That's why it's so difficult to launch probes to the outer planets, and why they take so long to get there.) As an example of the grand scale of the outer solar system, consider the eccentricity of the orbit of Pluto. The difference in the distance from Pluto to the Sun between Pluto's perihelion and aphelion is almost twenty times the total distance from the Earth to the Sun!
The orbital path of comets with extremely elongated elliptical orbits (eccentricity close to 1), parabolic, or hyperbolic orbits cannot be shown in their entirety (parabolic and hyperbolic orbits are theoretically infinite in extent). Orbits of such comets are tracked to beyond the orbit of Jupiter, following both the inbound and outbound legs of the orbit.
Over the centuries, artists depicting the solar system and designers of mechanical orreries have resorted to a variety of dirty tricks to get around this problem of scale, and Solar System Live implements most of them. First of all, you can choose to display either the entire solar system or just the inner system. When you display the entire system, the inner planets will be all mashed together (except if you select Equal mode for orbit plotting), but even though the discs may overlap you'll usually be able to see the relative longitudes around the sun. When you're interested in the details of the inner system (for instance, whether an opposition of Mars occurs at perihelion or aphelion), simply check "Inner" to display only the inner solar system.
Learning crossed eye fusion requires you to upload a small amount of software into your brain. About 80% of the population is able to learn crossed eye fusion (about 92% can perceive stereo with the aid of a stereoscope), but the technique requires some patience to learn. Once learned, it's like riding a bicycle--you'll never forget it and you can use it whenever you want without any conscious effort. Some people who can't manage the crossed eye trick are able to fuse stereoscope (wall-eye) images by directing their attention beyond the screen until the two images fuse. If you have trouble with the crossed eye technique described below, you might want to give that a try.
To learn crossed eye fusion, you need to learn to decouple two separate functions your brain usually links together: differential lateral aim of the eyes and focusing of the lens. Normally, as you look at objects at different distances from your eye, two things happen. First, you adjust your eyes from fully parallel aim (to look at an object at infinity) to extreme toe-in (to look at an object as close as you can focus). These two physiological functions are completely independent, but the brain learns to couple them because in normal viewing a given focus will always be correct for a certain degree of eye-cross.
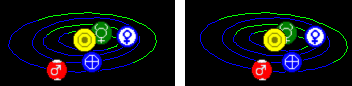
The best way to learn crossed eye fusion is to start at a time when you are well rested, relatively free of stress, and have ten minutes to practice without distractions or noise. (Did I just lose my audience?) Here's a small stereo pair to practice with. The smaller the image, the less you have to cross your eyes to bring the two frames into alignment, so it's best to start out with smaller images when you're learning.
Before beginning, you might want to practice crossing and uncrossing your eyes (gently, not to any extreme) and (if you can), focusing and defocusing your eyes while staring at a distant object (such as a picture on the wall in front of you). If you have trouble doing this, don't worry--the point is to get an idea what the two actions feel like.
Concentrate on picture pair, tilting your head until the two images are dead-level with respect to one another. Place your index finger at the border between the two pictures with your fingertip at the bottom of the pictures. Now keep your attention on the fingertip as you very slowly move it from the screen toward your nose. Notice what's happening to the two pictures on the screen: they're moving together as you cross your eyes to track the fingertip. Notice that they are also going out of focus as your eye's lens adjusts to keep your fingertip in focus. When your finger is about 20 cm from your nose (this will vary quite a bit based on your interocular separation and the distance from your eyes to the screen), the two blurry images in the background will merge with the left image overlapping the right one. At this point, you'll perceive three images: the left, the fused combination of the left and right, and the right. You might want to practice this fusion several times by slowly moving your finger back and forth from the screen to your nose as you observe the action of the images you perceive.
Now it's time to go for it. Bring the images into fusion by focusing on your fingertip and hold your attention on the fingertip for about 10 seconds. Be sure the fingertip is below the merged image, not overlapping it. Now focus your attention on that merged image. Tell your brain that a tiger may spring from it any second and that you have to see it clearly. As you shift your attention, the lenses of your eyes will refocus on the page while remaining crossed correctly for viewing the finger. The first few times you try this, you'll probably "lose it" and the images will float away. If as you attempt to refocus the finger separates into two images, you've probably got the finger too close or too near; when it's right, both the finger and the merged image will stay single--the only change will be them drifting in and out of focus.
When you are able to focus on the merged images, slowly remove the finger from the field of view and practice holding the fused images together and in sharp focus. If your head is not level, the two images will fail to merge vertically: just tilt your head until they come together. After you've held the images together for a few seconds (it takes 30 seconds for some people, especially when first learning the technique), suddenly a datastorm traverses the corpus callosum and Mars pops out of the screen and Mercury peeks around the far side of the Sun. After you've become accustomed to crossed eye fusion, you'll be able to do it instantly, on larger and more complicated images, without any need for the finger-tracking trick.